Whether you are a blogger, freelancer or student, you must have heard of Canva!
The key to creating a great design is testing, trying, and playing around with the text, shapes, sizes, layouts and colors.
I have recently upgraded to Canva Pro and I am glad that I have switched!
Disclosure: This post may contain affiliate links. Please read our disclosure policy for more information.
What is Canva?
Canva is an essential tool for all business owners who want to build their brand identity!
It is one of the best tools for designing graphics for social media.
The Pro version will give you access to high-quality images for your business and will also allow you to schedule posts.
In this blog post, I am going to share some Canva tips and tricks that will help you to be more productive and speed up your design process.
The Pro version is packed with 75+ million stock photos, videos, graphics and audio.
They have over 420,000+ free templates and 100 GB of cloud storage.
I use Canva every single day for creating graphics for my blog and social media platforms!
Canva tips and tricks:
Have a look at these Canva tips and tricks to create better designs.
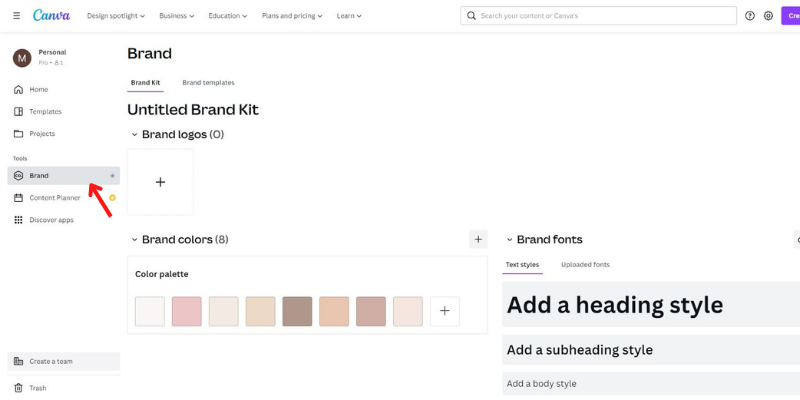
1. Brand kit
A brand kit speaks volumes about the visual elements of your brand.
It makes your business more easily recognizable by adding a visual identity.
A brand must be recognizable in order to build trust and develop loyalty.
Here is how you can do it:
Click on “Brand Kit” on the left column under Tools.
Then click on “Add brand kit” and name it.
Then upload the logo, fonts and color palette so that you can access it from the editor.
2. Align text and images
Align your images and text on Canva with just one click!
Select all the text and images on the canvas and click on Position on the top right corner of the screen.
Click on “Left”, “Right” or “Center” according to your needs and the texts will be aligned.
3. Image background remover
Select the image on the canvas and then select “Edit image” on the top toolbar.
Click on “Background remover”. Your background will be automatically removed.
The images with simple backgrounds will be easily removed.
However, for the ones with complex backgrounds, you may have to manually adjust it by using the “Erase” and “Restore” tools.
4. Export an image with transparent background
This is a Canva Pro feature.
Click on the “Download” option.
Set the file type to PNG, check on the “Transparent background” box and then download the image.
Your image will be downloaded with a transparent background!
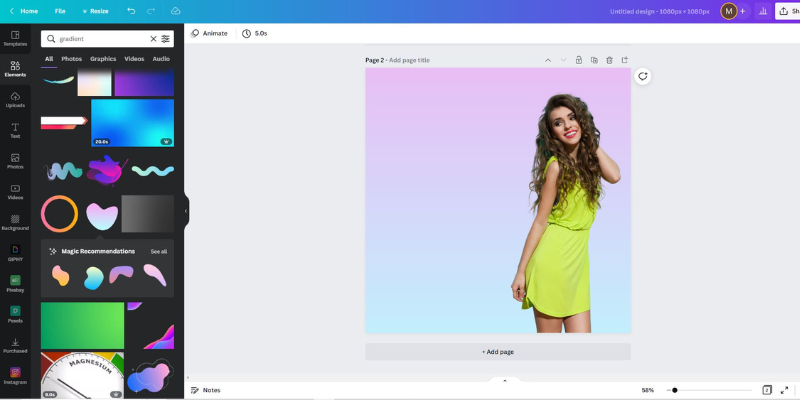
5. Gradient background
Solid colors can appear boring at times. Instead, you can mix colors to form a gradient background.
How to create a gradient background?
Click on the Element from the left panel and type “Gradient”.
Choose your desired element from the library. drag and drop the gradient in your design.
Click on the color picker from the top menu to change the gradient’s color to any other color of your choice.
6. Magic Resize tool
If you are into social media, you will know the pain of creating content for all the platforms regularly.
However, you can effortlessly create the same content for Instagram, Facebook or Twitter by resizing it on Canva.
You don’t have to make any manual adjustments to fit the size of the canvas.
Click on “Resize” on the top menu and add the custom size measurements. Then click on “Copy and resize”.
This feature allows you to create content for all platforms in a matter of seconds!
7. Lock elements
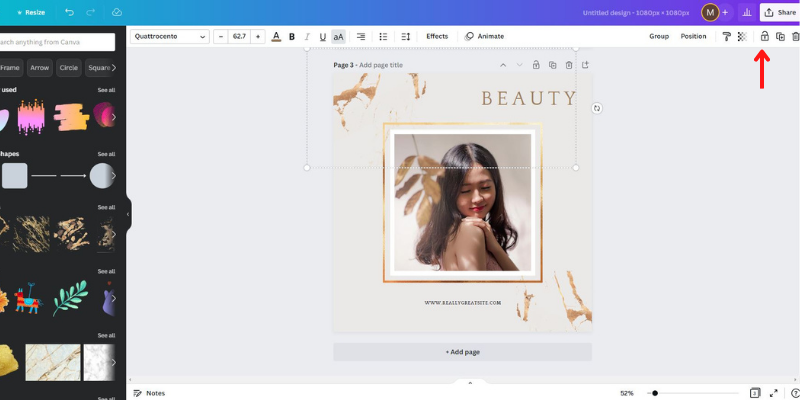
There are some great benefits of using the lock feature on Canva.
It will stop certain elements from moving around in your template.
Go to the top toolbar and select the “lock” icon.
Click on the icon to lock the particular feature that you have selected.
Apply this feature to all the elements that you don’t want to move.
8. Add an outline to the images
You must have seen this on many YouTube thumbnails and many social media posts.
Firstly, remove the background of the image. If you already have a transparent image, then just upload it to Canva and skip this step.
Select the photo and go to “Edit Image” on the top menu bar. Scroll down and open the shadows feature. Select the “Glow” under the section of Shadows. The glow effect will be applied to the image.

Then click on “Glow” again to access the settings.
Move the transparency to 100 and the blur to 0. Increase the “Size” according to your needs. Then change the color of the outline.

9. Add grid line
This feature will help you to line up elements more accurately.
Click on File on the top menu bar and select “Show rulers and guides”. The rulers will then appear around your page.
Moreover, the units of measurement will match your document.
Hover over the ruler until the cursor changes. You can click and drag it down. A line will appear and you can position this wherever you want on the page.
10. Upload fonts
Usually, Canva has a lot of fonts available for you to use in your projects.
Select the Brand Kit on the left sidebar.
Click on “Upload a font”, search for the file name and mark it as open.
Now go to the Canva editor and click on the font dropdown menu. You find your uploaded font over there. Select it and apply it to any text!
11. Share your designs as templates
Whether you want to share your design with your teammate or want to sell Canva templates, this feature will do it all!
Go to “Share” on the top menu and then click on “Share a link to use as a template”. That will copy the link of the specific template on your clipboard.
Now share the link with your co-worker or your clients!
12. Curve texts
Sometimes it is needed to curve a text to align it with the shape of an image or a graphic.
Simply, select the text, go to “Effects” and click on “Curve” from the Shape tab.
Go down to the slider bar underneath the curve and change the size to fit the design.
13. Group Elements
Sometimes there are lots of elements and texts aligned in your design. You might need to move four or five elements to change the design.
However, moving them individually can accidentally change the alignment or the symmetry of the design.
How can you group elements in Canva?
Select those elements that you want to group.
Then click on “Group” on the top menu bar.
Now when you move it, they will all move together.
14. Version history
This feature is used for seeing all the earlier versions of your design.
Sometimes you might need to revert back to your original design or any other phase in your design process.
Click on “Version history” from the File tab.
It will show you all your design versions.
You can either restore the design or make a copy of it to start designing on it.
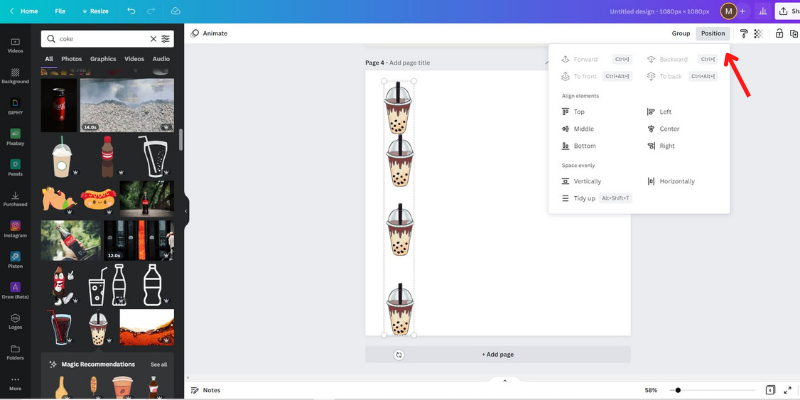
15. Space all the elements evenly
Suppose there are a number of elements in your design and they need to be placed together at a particular distance from each other.
You can arrange it manually but it may not be accurate.
You can space all the elements evenly with just one click!
Select all the elements in Canva and click on the Position tab.
Under the “Space evenly” section you can find the options to space your elements horizontally or vertically.

16. Content planner
Use the Canva content planner to plan out all your content on social media.
Go to the Share tab on the top menubar and click “Share on social”.
Link your Instagram, Facebook or Pinterest account, so that you can manage all of them from the Canva Content Planner.
Select which date you want to post it, add the time when you want the post to go live on your Instagram account and click on “Next”.
Then select the social media platform where you want to post, write a caption and hit “Schedule post”.
You can only schedule static photos on Instagram with Canva.
Is Canva Pro worth it?
As I said earlier, I have recently upgraded to Canva Pro and I am glad that I made the change!
Canva Pro is a life saver for any business owner!
I started with the free version and sometimes I couldn’t find the perfect image or graphic for my design. Eventually, I upgraded.
In short, you will be getting a lot of value for the price you are paying.
Canva Pro pricing
It costs $12.99 per month when you pay monthly.
They charge $119.99 per year or $9.99 per month when it is billed yearly.
Hence, sign up for the yearly plan to get the best deal!
Final thoughts on Canva tips and tricks
I hope these tips will help you to create beautiful designs in the future.
Start with the free version of Canva and upgrade it when you need to.
Join Canva Pro to get the best designing experience.
Canva Pro has A LOT to offer for all business owners. Moreover, it is FREE to use for 30 days!
Create beautiful graphics with these Canva tips and share them on your social media! Kick start your career as a graphic designer with Canva!


Thanks for sharing your thoughts!